9.1. Lesson: ラスタのベクタへの変換
Converting between raster and vector formats allows you to make use of both raster and vector data when solving a GIS problem, as well as using the various analysis methods unique to these two forms of geographic data. This increases the flexibility you have when considering data sources and processing methods for solving a GIS problem.
ラスタとベクタの分析を結びつけるために、データのタイプをもう一方のものに変換する必要があります。ベクタのレッスンの前にラスタを変換してみましょう。
**このレッスンの目標:**分析を完結するためにラスタをベクタにすること。
9.1.1.  Follow Along: The Raster to Vector Tool
Start with the map from the last module, raster_analysis.qgs. There you should have the all_conditions_simple.tif calculated during the previous exercises.
Click on Raster ‣ Conversion ‣ Polygonize (Raster to Vector). The tool dialog will appear.
このように設定します:
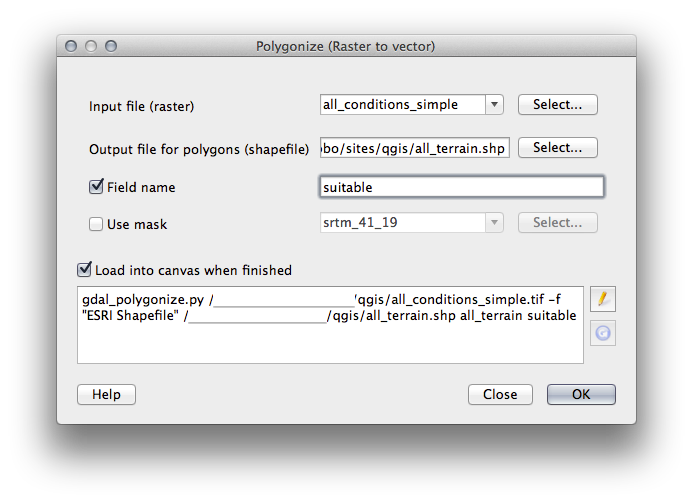
Change the field name (describing the values of the raster) to suitable.
Save the shapefile under exercise_data/residential_development as all_terrain.shp.
Now you have a vector file which contains all the values of the raster, but the only areas you’re interested in are those that are suitable; i.e., those polygons where the value of suitable is 1. You can change the style of this layer if you want to have a clearer visualization of it.
9.1.2. Try Yourself
ベクタ分析のモジュールに戻って参照ください。
- Create a new vector file that contains only the polygons where suitable has the value of 1.
- Save the new file as exercise_data/residential_development/ as suitable_terrain.shp.
9.1.3. Follow Along: The Vector to Raster Tool
Although unnecessary for our current problem, it’s useful to know about the opposite conversion from the one performed above. Convert to raster the suitable_terrain.shp vector file you just created in previous step.
- Click on Raster ‣ Conversion ‣ Rasterize (Vector to Raster) to start this tool, then set it up as in the screenshot below:
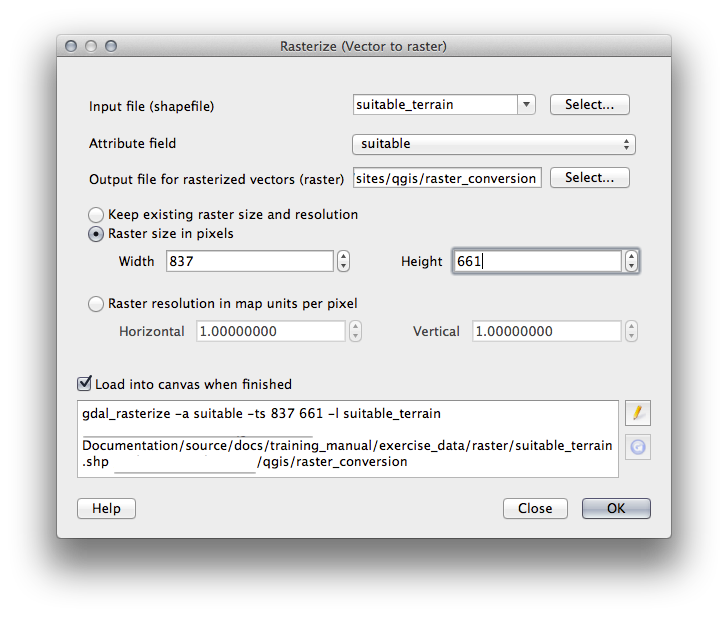
入力ファイル は all_terrain;
- Output file... is exercise_data/residential_development/raster_conversion.tif;
幅 と 高さ はそれぞれ 837 と 661 です。
ノート
The size of the output image is specified here to be the same as the original raster which was vectorized. To view the dimensions of an image, open its metadata (Metadata tab in the Layer Properties).
- Click OK on the dialog to begin the conversion process.
- When it is complete, gauge its success by comparing the new raster with the original one. They should match up exactly, pixel for pixel.
9.1.4. In Conclusion
Converting between raster and vector formats allows you to widen the applicability of data, and need not lead to data degradation.
9.1.5. What’s Next?
Now that we have the results of the terrain analysis available in vector format, they can be used to solve the problem of which buildings we should consider for the residential development.