18.3. Lesson: QGIS における SpatiaLite データベースの操作
While PostGIS is generally used on a server to provide spatial database capabilities to multiple users at the same time, QGIS also supports the use of a file format called spatialite that is a lightweight, portable way to store an entire spatial database in a single file. Obviously, these 2 types of spatial databases should be used for different purposes, but the same basic principles and techniques apply to both. Let’s create a new spatialite database and explore the functionality provided to work with these databases in QGIS.
このレッスンの目標 : QGIS ブラウザのインターフェイスを使用して SpatiaLite データベースを利用する方法を学ぶ.
18.3.1.  Follow Along: ブラウザで SpatiaLite データベースを作成する
ブラウザのパネルを使って新しい SpatiaLite データベースを作成し, QGIS で使用するための準備をすることができます.
Spatialite エントリを右クリックし, Create Database を選択します.
qgis-sl.db という名前でファイルシステム上に保存します.
再びブラウザツリー内の Spatialite を右クリックし, New Connection を選択して先ほど作成したファイルを探して開きます.
これでブラウザツリーに新しいデータベースが構成され, その下には何も持たないことから, 行える操作は削除できることだけだということがわかります.このデータベースには何のテーブルも追加していないのでこれは当然です. それでは先に進んでみましょう.
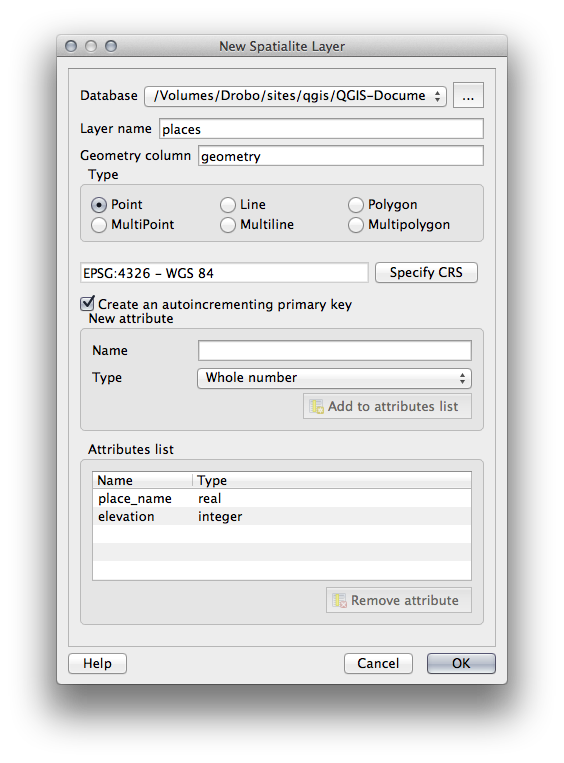
Find the button to create a new layer and use the dropdown to create a new new Spatialite layer, or select Layer –> New –> New Spatialite Layer.

前の手順で作成したデータベースをドロップダウン内から選択します.
レイヤに places という名前を付けてください.
次に Create an auto-incrementing primary key のチェックボックスを選択します.
下のような2つの属性を追加
OK をクリックしてテーブルを作成します.
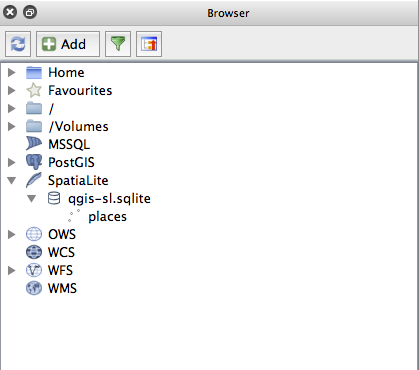
ブラウザ上部にある更新ボタンをクリックすると, places テーブルの一覧が表示されます.
テーブルを右クリックして, 前のレッスンで行ったようにプロパティを表示することができます.
ここから編集のセッションを開始して直接新しいデータベースにデータを追加することができます.
DB Manager を利用してデータベースにデータをインポートする方法を学びました. 新しい SpatiaLite データベースにデータをインポートするためにこの手法を用いることができます.
18.3.2. In Conclusion
ここでは SpatiaLite データベースを作成し, そこにテーブルを追加して QGIS のレイヤとしてテーブルを利用する方法を見てきました.