.
Oracle Spatial GeoRaster プラグイン
In Oracle databases, raster data can be stored in SDO_GEORASTER objects available
with the Oracle Spatial extension. In QGIS, the  Oracle Spatial GeoRaster plugin is supported by GDAL and depends on Oracle’s
database product being installed and working on your machine. While Oracle is
proprietary software, they provide their software free for development and testing
purposes. Here is one simple example of how to load raster images to GeoRaster:
Oracle Spatial GeoRaster plugin is supported by GDAL and depends on Oracle’s
database product being installed and working on your machine. While Oracle is
proprietary software, they provide their software free for development and testing
purposes. Here is one simple example of how to load raster images to GeoRaster:
$ gdal_translate -of georaster input_file.tif geor:scott/tiger@orcl
デフォルトのGDAL_IMPORTテーブルにラスタがロードされ、カラム名は``RASTER``になります。
接続の管理
Firstly, the Oracle GeoRaster Plugin must be enabled using the Plugin Manager
(see プラグインダイアログ). The first time you load a GeoRaster in
QGIS, you must create a connection to the Oracle database that contains the data.
To do this, begin by clicking on the Add Oracle GeoRaster Layer
toolbar button – this will open the Select Oracle Spatial GeoRaster
dialog window. Click on [New] to open the dialog window, and specify
the connection parameters (See Figure_oracle_raster_1):
名称: データベース接続の名称を入力します
データベースインスタンス:接続するデータベースの名称を入力します 。
ユーザ名: データベースにアクセスするユーザ名を指定します。
パスワード: データベースにアクセスするために必要なユーザ名に関連付けられているパスワードを入力します。
Figure Oracle Raster 1:
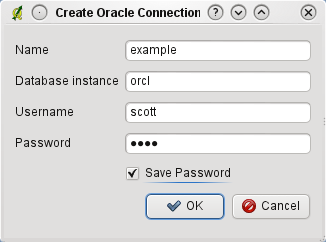
Oracle接続ダイアログの作成
Now, back on the main Oracle Spatial GeoRaster dialog window (see Figure_oracle_raster_2), use the drop-down list to choose one connection, and use the [Connect] button to establish a connection. You may also [Edit] the connection by opening the previous dialog and making changes to the connection information, or use the [Delete] button to remove the connection from the drop-down list.
Selecting a GeoRaster
いったん接続が確立されると、サブデータセットウィンドウにはGDALサブデータセット名の形式でデータベースにGeoRasterカラムを含むすべてのテーブルの名称が表示されます。
リストアップされたサブデータセットのいずれかをクリックし、 **[選択]**をクリックしてテーブル名を選択します。 今サブデータセットの別のリストは、そのテーブルのGeoRaster列の名称で表示されています。ほとんどのユーザは同じテーブルに1つまたは2つ以上のGeoRaster列を持たないため、これはたいてい短いリストです。
Click on one of the listed subdatasets and then click on [Select] to choose one of the table/column combinations. The dialog will now show all the rows that contain GeoRaster objects. Note that the subdataset list will now show the Raster Data Table and Raster Id pairs.
いつでも選択エントリは既知のGeoRasterに直接移動するか、最初に戻って、別のテーブル名を選択するために編集することができます。
Figure Oracle Raster 2:
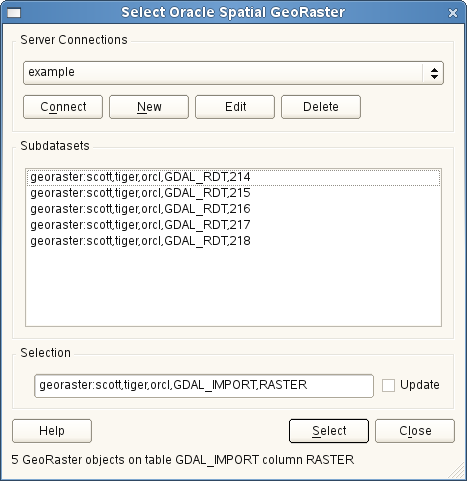
Oracle GeoRaster ダイアログの選択
The selection data entry can also be used to enter a WHERE clause at the end of the identification string (e.g., geor:scott/tiger@orcl,gdal_import,raster,geoid=). See http://www.gdal.org/frmt_georaster.html for more information.
GeoRasterの表示
最終的に、ラスタデータテーブルとRasterIDのリストからGeoRasterとを選択することによって、ラスタイメージがQGISにロードされます。
The Select Oracle Spatial GeoRaster dialog can be closed now and the next time it opens, it will keep the same connection and will show the same previous list of subdatasets, making it very easy to open up another image from the same context.
ノート
ピラミッドを含むGeoRasterはより速く表示できますが、ピラミッドはOracle PL/SQL またはgdaladdoを使用してQGISの外部から生成する必要があります。
以下は``gdaladdo``を使用した例です:
gdaladdo georaster:scott/tiger@orcl,georaster\_table,georaster,georid=6 -r
nearest 2 4 6 8 16 32
これがPL/SQLの使用例です:
$ sqlplus scott/tiger
SQL> DECLARE
 gr sdo_georaster;
BEGIN
    SELECT image INTO gr FROM cities WHERE id = 1 FOR UPDATE;
    sdo_geor.generatePyramid(gr, 'rLevel=5, resampling=NN');
    UPDATE cities SET image = gr WHERE id = 1;
    COMMIT;
END;