.
グラフィカルモデラー
*図形モデラー*で、シンプルで使いやすいインタフェースを使って複合的なモデルを作成することができます。GISで操作する際、たいていの解析操作は孤立しておらず、一連の操作の連鎖の一部です。図形モデラーを使用すると、プロセスのチェーンは単一のプロセスにラップすることができ、異なる設定を入力して単一のプロセスを行うよりもより簡単で便利です。どんなに多くのステップと、それに伴い異なるアルゴリズムがあろうと、モデルは単一のアルゴリズムとして実行され、大規模なモデルでは特に、時間と労力を節約できます。
プロセッシングメニューからモデラーは開けます.
モデラーにはモデルの構造とワークフローを表現するワーキングキャンバスがあります.ウィンドウの左のパートには2つのタブを持つパネルがありモデルに新しいエレメントを加えるために使われます.
Figure Processing 16:
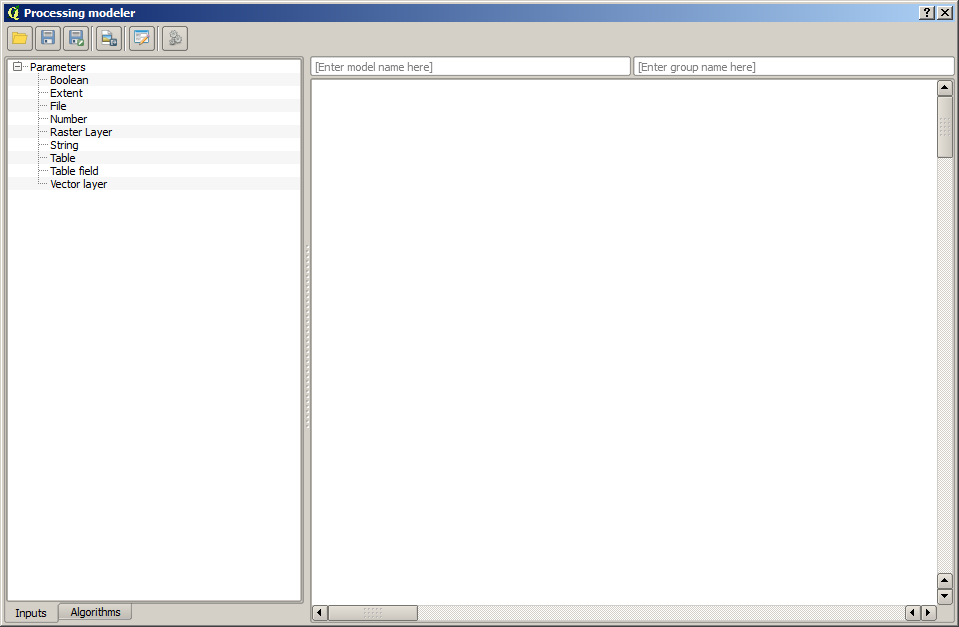
モデラー 
モデルの作成には2つのステップが含まれます:
必須入力項目の定義. これらの入力はパラメータウィンドウに追加されます, ですからユーザはモデルの実行時にそれらの値を入力できます. モデル自身はアルゴリズムですからパラメータウィンドウはプロセッシングフレームワークの全てのアルゴリズムで入力が必要になった時に自動的に生成されます.
ワークフローの定義. モデルの入力データを使ってアルゴリズムの追加と入力をどう使いすでにモデルにあるアルゴリズムを使って出力をどう作るかを指定したりすることでワークフロウを定義します
入力の定義
モデル作成の最初の一歩は必要な入力を定義することです. モデラーウィンドウの左にある Inputs タブには以下のエレメントがあります:
ラスタレイヤ
ベクタレイヤ
文字列
テーブルフィールド
テーブル
領域
数値
真偽値
ファイル
Double-clicking on any of these elements, a dialog is shown to define its characteristics. Depending on the parameter itself, the dialog may contain just one basic element (the description, which is what the user will see when executing the model) or more of them. For instance, when adding a numerical value, as can be seen in the next figure, apart from the description of the parameter, you have to set a default value and a range of valid values.
Figure Processing 17:
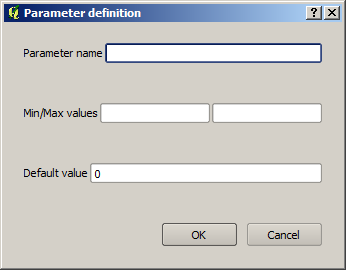
モデルパラメータ
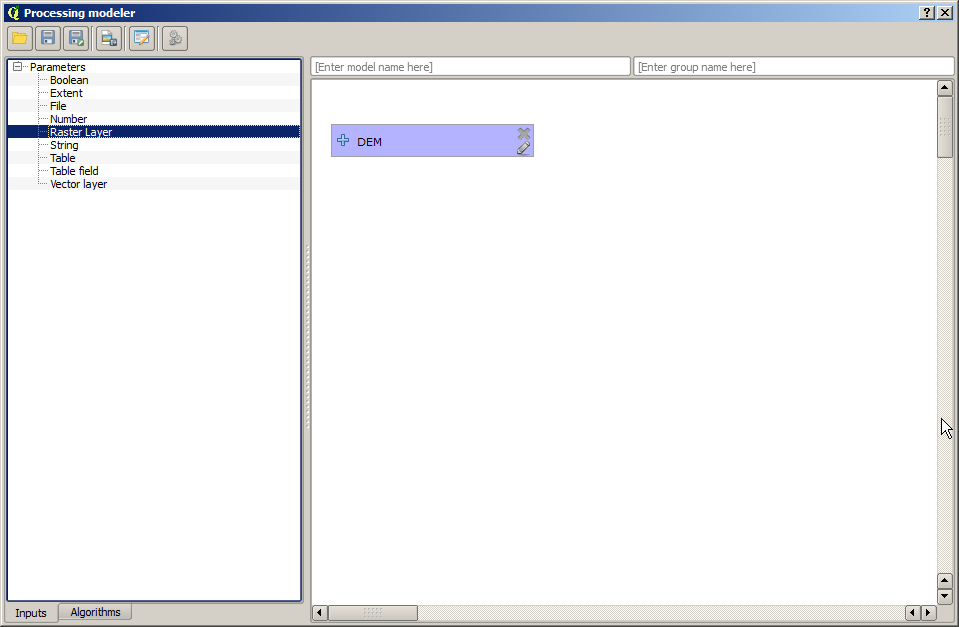
それぞれの入力が追加されるとモデラーキャンバスに新しいエレメントが追加されます.
Figure Processing 18:
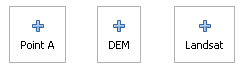
モデルパラメータ
You can also add inputs by dragging the input type from the list and dropping it in the modeler canvas, in the position where you want to place it.
ワークフロウの定義
入力の定義が行われた後にそれらに適用するアルゴリズムの定義を行います. アルゴリズムは Algorithms タブで見つけることができツールボックスと同じようにグループ分けされています.
Figure Processing 19:
モデルパラメータ
The appearance of the toolbox has two modes here as well: simplified and advanced. However, there is no element to switch between views in the modeler, so you have to do it in the toolbox. The mode that is selected in the toolbox is the one that will be used for the list of algorithms in the modeler.
To add an algorithm to a model, double-click on its name or drag and drop it, just like it was done when adding inputs. An execution dialog will appear, with a content similar to the one found in the execution panel that is shown when executing the algorithm from the toolbox. The one shown next corresponds to the SAGA ‘Convergence index’ algorithm, the same example we saw in the section dedicated to the toolbox.
Figure Processing 20:
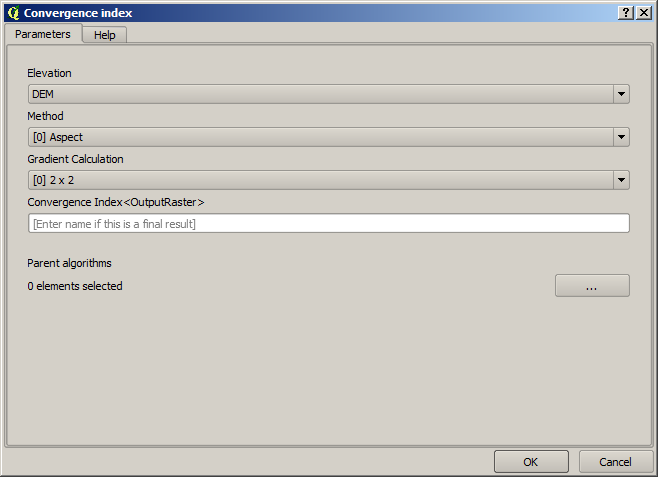
モデルパラメータ
As you can see, some differences exist. Instead of the file output box that was used to set the file path for output layers and tables, a simple text box is used here. If the layer generated by the algorithm is just a temporary result that will be used as the input of another algorithm and should not be kept as a final result, just do not edit that text box. Typing anything in it means that the result is final and the text that you supply will be the description for the output, which will be the output the user will see when executing the model.
Selecting the value of each parameter is also a bit different, since there are important differences between the context of the modeler and that of the toolbox. Let’s see how to introduce the values for each type of parameter.
- Layers (raster and vector) and tables. These are selected from a list, but in this case, the possible values are not the layers or tables currently loaded in QGIS, but the list of model inputs of the corresponding type, or other layers or tables generated by algorithms already added to the model.
- Numerical values. Literal values can be introduced directly in the text box. But this text box is also a list that can be used to select any of the numerical value inputs of the model. In this case, the parameter will take the value introduced by the user when executing the model.
- String. As in the case of numerical values, literal strings can be typed, or an input string can be selected.
- Table field. The fields of the parent table or layer cannot be known at design time, since they depend on the selection of the user each time the model is executed. To set the value for this parameter, type the name of a field directly in the text box, or use the list to select a table field input already added to the model. The validity of the selected field will be checked at run time.
In all cases, you will find an additional parameter named Parent algorithms that is not available when calling the algorithm from the toolbox. This parameter allows you to define the order in which algorithms are executed by explicitly defining one algorithm as a parent of the current one, which will force the parent algorithm to be executed before the current one.
When you use the output of a previous algorithm as the input of your algorithm, that implicitly sets the previous algorithm as parent of the current one (and places the corresponding arrow in the modeler canvas). However, in some cases an algorithm might depend on another one even if it does not use any output object from it (for instance, an algorithm that executes an SQL sentence on a PostGIS database and another one that imports a layer into that same database). In that case, just select the previous algorithm in the Parent algorithms parameter and the two steps will be executed in the correct order.
Once all the parameters have been assigned valid values, click on [OK] and the algorithm will be added to the canvas. It will be linked to all the other elements in the canvas, whether algorithms or inputs, that provide objects that are used as inputs for that algorithm.
Elements can be dragged to a different position within the canvas, to change the way the module structure is displayed and make it more clear and intuitive. Links between elements are updated automatically. You can zoom in and out by using the mouse wheel.
You can run your algorithm anytime by clicking on the [Run] button. However, in order to use the algorithm from the toolbox, it has to be saved and the modeler dialog closed, to allow the toolbox to refresh its contents.
モデルの保存とロード
Use the [Save] button to save the current model and the [Open] button to open any model previously saved. Models are saved with the .model extension. If the model has been previously saved from the modeler window, you will not be prompted for a filename. Since there is already a file associated with that model, the same file will be used for any subsequent saves.
モデルの保存を行う前にウィンドウの上部にあるテキストボックスを使って名前とグループを入力しなければいけません.
Models saved on the models folder (the default folder when you are prompted for a filename to save the model) will appear in the toolbox in the corresponding branch. When the toolbox is invoked, it searches the models folder for files with the .model extension and loads the models they contain. Since a model is itself an algorithm, it can be added to the toolbox just like any other algorithm.
モデルのフォルダは Modeler グループの下にあるプロセッシング構成ダイアログで設定できます.
モデルは models フォルダーからロードされツールボックスだけではなく モデラーウィンドウの Algorithms タブのアルゴリズムツリーにも表示されます. これは他の任意のモデルを追加するのと同じようにモデルを大きなモデルの一部として取り込むことが可能であることを意味します.
In some cases, a model might not be loaded because not all the algorithms included in its workflow are available. If you have used a given algorithm as part of your model, it should be available (that is, it should appear in the toolbox) in order to load that model. Deactivating an algorithm provider in the processing configuration window renders all the algorithms in that provider unusable by the modeler, which might cause problems when loading models. Keep that in mind when you have trouble loading or executing models.
モデルの編集
作成中のモデルは編集できます, ワークフローやアルゴリズム間のリレーションシップの再定義がや入力の再定義をモデル内で行えます.
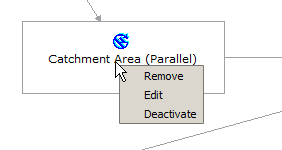
キャンバスに表示しているモデルのアルゴリズムをマウス右ボタンでクリックすると次のようなコンテキストメニューが表示されます:
Figure Processing 22:
モデラー右ボタンクリック
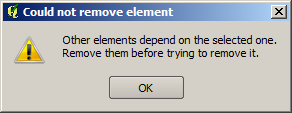
Selecting the Remove option will cause the selected algorithm to be removed. An algorithm can be removed only if there are no other algorithms depending on it. That is, if no output from the algorithm is used in a different one as input. If you try to remove an algorithm that has others depending on it, a warning message like the one you can see below will be shown:
Figure Processing 23:
アルゴリズムを削除できない
Selecting the Edit option or simply double-clicking on the algorithm icon will show the parameters dialog of the algorithm, so you can change the inputs and parameter values. Not all input elements available in the model will appear in this case as available inputs. Layers or values generated at a more advanced step in the workflow defined by the model will not be available if they cause circular dependencies.
Select the new values and then click on the [OK] button as usual. The connections between the model elements will change accordingly in the modeler canvas.
モデルヘルプファイルとメタ情報の編集
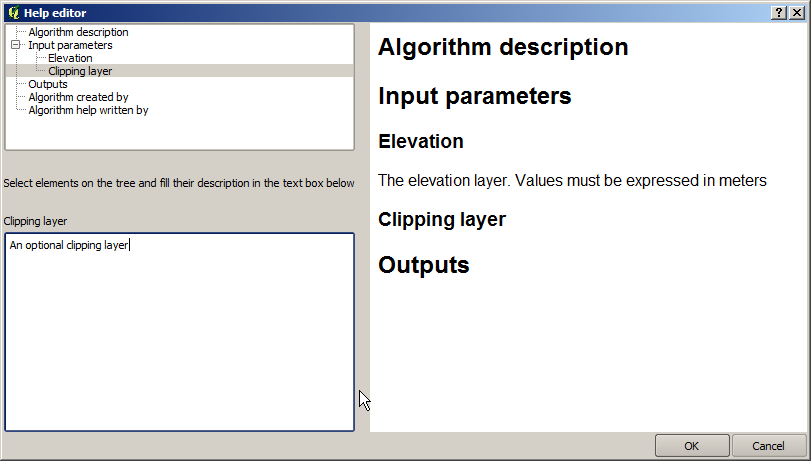
あなたは、モデラー自体から、あなたのモデルを文書化することができます。 **[Edit model help]**ボタンをクリックするだけで、そして、次に示すようなダイアログが表示されます。
Figure Processing 25:
ヘルプエディション
On the right-hand side, you will see a simple HTML page, created using the description of the input parameters and outputs of the algorithm, along with some additional items like a general description of the model or its author. The first time you open the help editor, all these descriptions are empty, but you can edit them using the elements on the left-hand side of the dialog. Select an element on the upper part and then write its description in the text box below.
モデルヘルプは、モデル自身と同じフォルダにファイルとして保存されます。それは自動的に実施されるため、保存について心配する必要はありません。
利用可能なアルゴリズムについて
You might notice that some algorithms that can be be executed from the toolbox do not appear in the list of available algorithms when you are designing a model. To be included in a model, an algorithm must have a correct semantic, so as to be properly linked to others in the workflow. If an algorithm does not have such a well-defined semantic (for instance, if the number of output layers cannot be known in advance), then it is not possible to use it within a model, and thus, it does not appear in the list of algorithms that you can find in the modeler dialog.
Additionally, you will see some algorithms in the modeler that are not found in the toolbox. These algorithms are meant to be used exclusively as part of a model, and they are of no interest in a different context. The ‘Calculator’ algorithm is an example of that. It is just a simple arithmetic calculator that you can use to modify numerical values (entered by the user or generated by some other algorithm). This tool is really useful within a model, but outside of that context, it doesn’t make too much sense.