.
ツールボックス
The Toolbox is the main element of the processing GUI, and the one that you are more likely to use in your daily work. It shows the list of all available algorithms grouped in different blocks, and it is the access point to run them, whether as a single process or as a batch process involving several executions of the same algorithm on different sets of inputs.
Figure Processing 5:
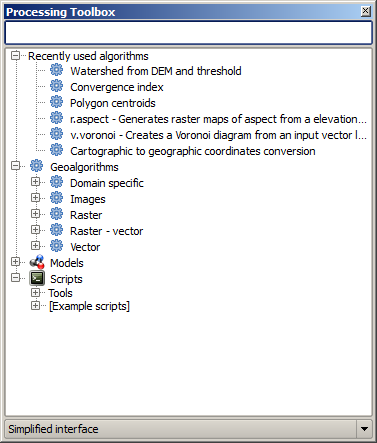
プロセッシングツールボックス 
ツールボックスではすべての有効なアルゴリズムが用意されたグループに分けられています.それらにすべてのグループは Geoalgorithms という単一のツリーエントリのしたにおかれています.
Additionally, two more entries are found, namely Models and Scripts. These include user-created algorithms, and they allow you to define your own workflows and processing tasks. We will devote a full section to them a bit later.
In the upper part of the toolbox, you will find a text box. To reduce the number of algorithms shown in the toolbox and make it easier to find the one you need, you can enter any word or phrase on the text box. Notice that, as you type, the number of algorithms in the toolbox is reduced to just those that contain the text you have entered in their names.
In the lower part, you will find a box that allows you to switch between the simplified algorithm list (the one explained above) and the advanced list. If you change to the advanced mode, the toolbox will look like this:
Figure Processing 6:
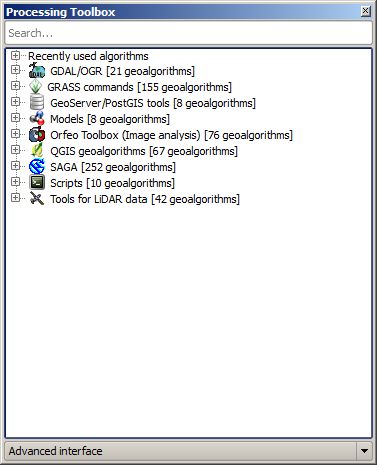
プロセッシングツールボックス (アドバンスドモード)
In the advanced view, each group represents a so-called ‘algorithm provider’, which is a set of algorithms coming from the same source, for instance, from a third-party application with geoprocessing capabilities. Some of these groups represent algorithms from third-party applications like SAGA, GRASS or R, while others contain algorithms directly coded as part of the processing plugin, not relying on any additional software.
このビューでは、それらが元の名前とグループで表示されるため、アルゴリズムをバックアップしているアプリケーションの特定の知識を持っているユーザにお勧めします。
また、いくつかの追加のアルゴリズムは、とりわけR統計計算ソフトウェアに基づいて、LiDAR ツールやスクリプトなどの高度なビューでご利用いただけます。独立した QGIS ツールボックスに新しいアルゴリズムを追加するプラグインのみadvanced ビューで表示されます。
具体的には、simplified のビューには、次のプロバイダからのアルゴリズムが含まれています:
- GRASS
- SAGA
- OTB
ネイティブ QGIS アルゴリズム
In the case of running QGIS under Windows, these algorithms are fully-functional in a fresh installation of QGIS, and they can be run without requiring any additional installation. Also, running them requires no prior knowledge of the external applications they use, making them more accesible for first-time users.
もしあなたが上記のプロバイダで提供されていないアルゴリズムを使いたい場合ツールボックスの一番したにある対応するオプションを選択してアドバンストモードに切り替えて下さい.
アルゴリズムを実行したい場合ツールボックスの名前をダブルクリックすればいいです.
アルゴリズムダイアログ
Once you double-click on the name of the algorithm that you want to execute, a dialog similar to that in the figure below is shown (in this case, the dialog corresponds to the SAGA ‘Convergence index’ algorithm).
Figure Processing 7:
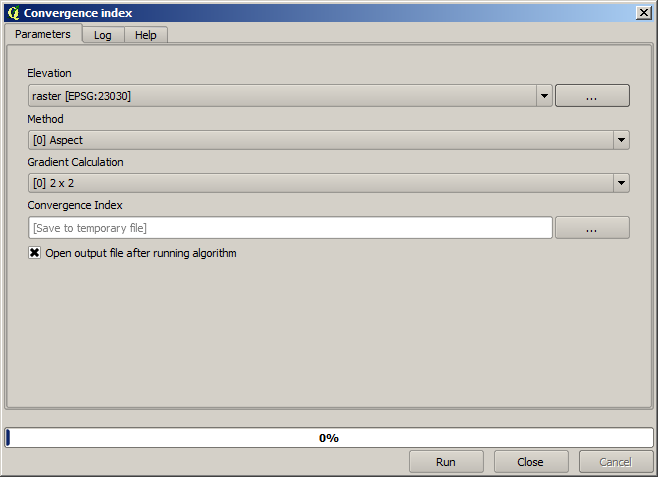
パラメータダイアログ
This dialog is used to set the input values that the algorithm needs to be executed. It shows a table where input values and configuration parameters are to be set. It of course has a different content, depending on the requirements of the algorithm to be executed, and is created automatically based on those requirements. On the left side, the name of the parameter is shown. On the right side, the value of the parameter can be set.
パラメータの数とタイプは、アルゴリズムの特性に依存しますが、構造は、それらのすべてについても同様です。テーブルで検出されたパラメータは、次のいずれかのタイプのものとすることができます。
QGIS で利用できる(今開かれた)レイヤのリストから選択されたラスタレイヤです。選択したものは右側のボタンだけでなく、 QGIS に読み込まれていないことを表すレイヤのファイル名を選択します。
A vector layer, to select from a list of all vector layers available in QGIS. Layers not loaded in QGIS can be selected as well, as in the case of raster layers, but only if the algorithm does not require a table field selected from the attributes table of the layer. In that case, only opened layers can be selected, since they need to be open so as to retrieve the list of field names available.
以下の図のように各ベクタレイヤにボタンが表示されるでしょう.
Figure Processing 8:

ベクター繰り返しボタン
If the algorithm contains several of them, you will be able to toggle just one of them. If the button corresponding to a vector input is toggled, the algorithm will be executed iteratively on each one of its features, instead of just once for the whole layer, producing as many outputs as times the algorithm is executed. This allows for automating the process when all features in a layer have to be processed separately.
- A table, to select from a list of all available in QGIS. Non-spatial tables are loaded into QGIS like vector layers, and in fact they are treated as such by the program. Currently, the list of available tables that you will see when executing an algorithm that needs one of them is restricted to tables coming from files in dBase (.dbf) or Comma-Separated Values (.csv) formats.
利用可能なオプションのリストから選択するオプション.
- A numerical value, to be introduced in a text box. You will find a button by its side. Clicking on it, you will see a dialog that allows you to enter a mathematical expression, so you can use it as a handy calculator. Some useful variables related to data loaded into QGIS can be added to your expression, so you can select a value derived from any of these variables, such as the cell size of a layer or the northernmost coordinate of another one.
Figure Processing 9:

数値選択
レンジ, 2個のテキストボックスで最小値と最大値で指定されます.
テキストストリング, 1個のテキストボックスで指定されます.
フィールドは、ベクタレイヤまたは別のパラメータで選択された単一のテーブルの属性テーブルから選択します。
A coordinate reference system. You can type the EPSG code directly in the text box, or select it from the CRS selection dialog that appears when you click on the button on the right-hand side.
An extent, to be entered by four numbers representing its xmin, xmax, ymin, ymax limits. Clicking on the button on the right-hand side of the value selector, a pop-up menu will appear, giving you two options: to select the value from a layer or the current canvas extent, or to define it by dragging directly onto the map canvas.
Figure Processing 10
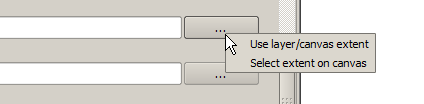
範囲選択
最初のオプションを選択すると次のようなウィンドウが表示されます.
Figure Processing 11
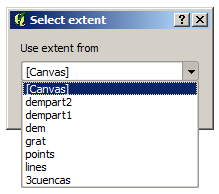
範囲リスト
2番目の1つを選択した場合は、パラメータウィンドウはそれ自身を非表示にしますので、キャンバスにクリックしてドラッグすることができます。選択した矩形を定義すると、ダイアログが再表示され、エクステントのテキストボックス内の値を格納します。
Figure Processing 12:
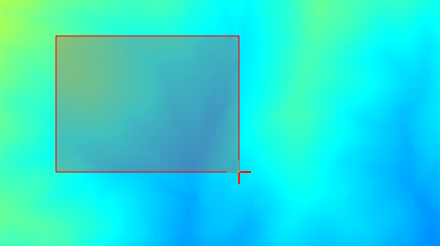
範囲をドラッグ
A list of elements (whether raster layers, vector layers or tables), to select from the list of such layers available in QGIS. To make the selection, click on the small button on the left side of the corresponding row to see a dialog like the following one.
Figure Processing 13:
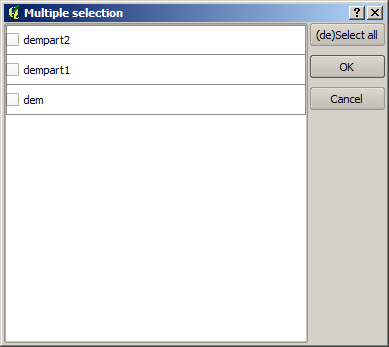
複数選択
小さなテーブルは、ユーザによって編集されます。これらは、とりわけ、ルックアップテーブルまたはコンボリューションカーネルのようなパラメータを定義するために使用されます。
右側にあるボタンをクリックするとテーブルを表示してその値を編集できます.
Figure Processing 14:
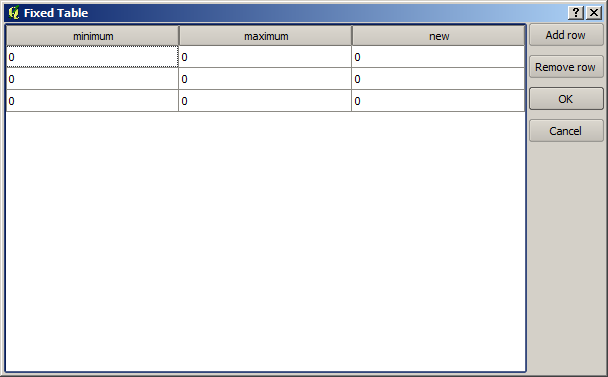
固定テーブル
アルゴリズムによっては、行数は、ウィンドウの右側にあるボタンを使用せずに変更できます。
You will find a [Help] tab in the the parameters dialog. If a help file is available, it will be shown, giving you more information about the algorithm and detailed descriptions of what each parameter does. Unfortunately, most algorithms lack good documentation, but if you feel like contributing to the project, this would be a good place to start.
投影法についての記述
Algorithms run from the processing framework — this is also true of most of the external applications whose algorithms are exposed through it. Do not perform any reprojection on input layers and assume that all of them are already in a common coordinate system and ready to be analized. Whenever you use more than one layer as input to an algorithm, whether vector or raster, it is up to you to make sure that they are all in the same coordinate system.
Note that, due to QGIS‘s on-the-fly reprojecting capabilities, although two layers might seem to overlap and match, that might not be true if their original coordinates are used without reprojecting them onto a common coordinate system. That reprojection should be done manually, and then the resulting files should be used as input to the algorithm. Also, note that the reprojection process can be performed with the algorithms that are available in the processing framework itself.
By default, the parameters dialog will show a description of the CRS of each layer along with its name, making it easy to select layers that share the same CRS to be used as input layers. If you do not want to see this additional information, you can disable this functionality in the processing configuration dialog, unchecking the Show CRS option.
CRSが異なる2つ以上の入力レイヤを使ってアルゴリズムの実行を試みる場合、警告ダイアログが表示されます。
まだアルゴリズムを実行するほとんどの場合、入力レイヤと重複しないため空のレイヤがせいされるような間違った結果を生成し、そのことに気づくことができます。
アルゴリズムによって生成されたデータオブジェクト
アルゴリズムによって生成されるデータオブジェクトは以下のタイプが利用できます:
ラスタレイヤ
ベクタレイヤ
テーブル
HTML ファイル (テキストとグラフィック出力の場合利用できます)
These are all saved to disk, and the parameters table will contain a text box corresponding to each one of these outputs, where you can type the output channel to use for saving it. An output channel contains the information needed to save the resulting object somewhere. In the most usual case, you will save it to a file, but the architecture allows for any other way of storing it. For instance, a vector layer can be stored in a database or even uploaded to a remote server using a WFS-T service. Although solutions like these are not yet implemented, the processing framework is prepared to handle them, and we expect to add new kinds of output channels in a near feature.
To select an output channel, just click on the button on the right side of the text box. That will open a save file dialog, where you can select the desired file path. Supported file extensions are shown in the file format selector of the dialog, depending on the kind of output and the algorithm.
The format of the output is defined by the filename extension. The supported formats depend on what is supported by the algorithm itself. To select a format, just select the corresponding file extension (or add it, if you are directly typing the file path instead). If the extension of the file path you entered does not match any of the supported formats, a default extension (usually .dbf` for tables, .tif for raster layers and .shp for vector layers) will be appended to the file path, and the file format corresponding to that extension will be used to save the layer or table.
If you do not enter any filename, the result will be saved as a temporary file in the corresponding default file format, and it will be deleted once you exit QGIS (take care with that, in case you save your project and it contains temporary layers).
You can set a default folder for output data objects. Go to the configuration dialog (you can open it from the Processing menu), and in the General group, you will find a parameter named Output folder. This output folder is used as the default path in case you type just a filename with no path (i.e., myfile.shp) when executing an algorithm.
When running an algorithm that uses a vector layer in iterative mode, the entered file path is used as the base path for all generated files, which are named using the base name and appending a number representing the index of the iteration. The file extension (and format) is used for all such generated files.
Apart from raster layers and tables, algorithms also generate graphics and text as HTML files. These results are shown at the end of the algorithm execution in a new dialog. This dialog will keep the results produced by any algorithm during the current session, and can be shown at any time by selecting Processing ‣ Results viewer from the QGIS main menu.
Some external applications might have files (with no particular extension restrictions) as output, but they do not belong to any of the categories above. Those output files will not be processed by QGIS (opened or included into the current QGIS project), since most of the time they correspond to file formats or elements not supported by QGIS. This is, for instance, the case with LAS files used for LiDAR data. The files get created, but you won’t see anything new in your QGIS working session.
他の出力タイプのすべてに対し、アルゴリズムによってか生成されると、ファイルをロードするかどうかをアルゴリズムに指示するために使用できるチェックボックスがあります。デフォルトでは、すべてのファイルが開かれます。
Optional outputs are not supported. That is, all outputs are created. However, you can uncheck the corresponding checkbox if you are not interested in a given output, which essentially makes it behave like an optional output (in other words, the layer is created anyway, but if you leave the text box empty, it will be saved to a temporary file and deleted once you exit QGIS).
プロセッシングフレームワークを構成する
As has been mentioned, the configuration menu gives access to a new dialog where you can configure how algorithms work. Configuration parameters are structured in separate blocks that you can select on the left-hand side of the dialog.
Along with the aforementioned Output folder entry, the General block contains parameters for setting the default rendering style for output layers (that is, layers generated by using algorithms from any of the framework GUI components). Just create the style you want using QGIS, save it to a file, and then enter the path to that file in the settings so the algorithms can use it. Whenever a layer is loaded by SEXTANTE and added to the QGIS canvas, it will be rendered with that style.
Rendering styles can be configured individually for each algorithm and each one of its outputs. Just right-click on the name of the algorithm in the toolbox and select Edit rendering styles. You will see a dialog like the one shown next.
Figure Processing 15:
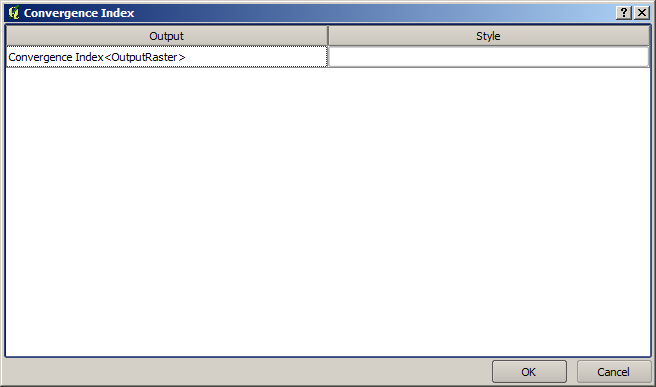
レンダリングシステム
それぞれの出力に設定したいスタイルファイル (.qml) を選択して [OK] を押して下さい.
Other configuration parameters in the General group are listed below:
- Use filename as layer name. The name of each resulting layer created by an algorithm is defined by the algorithm itself. In some cases, a fixed name might be used, meaning that the same output name will be used, no matter which input layer is used. In other cases, the name might depend on the name of the input layer or some of the parameters used to run the algorithm. If this checkbox is checked, the name will be taken from the output filename instead. Notice that, if the output is saved to a temporary file, the filename of this temporary file is usually a long and meaningless one intended to avoid collision with other already existing filenames.
- Use only selected features. If this option is selected, whenever a vector layer is used as input for an algorithm, only its selected features will be used. If the layer has no selected features, all features will be used.
- Pre-execution script file and Post-execution script file. These parameters refer to scripts written using the processing scripting functionality, and are explained in the section covering scripting and the console.
Apart from the General block in the settings dialog, you will also find a block for algorithm providers. Each entry in this block contains an Activate item that you can use to make algorithms appear or not in the toolbox. Also, some algorithm providers have their own configuration items, which we will explain later when covering particular algorithm providers.